Farmhouse Kitchen

One and a half year later, and we’re still working on our house. I don’t think it’ll ever end. There’s always things that needs upgrade or little DIY projects to do.

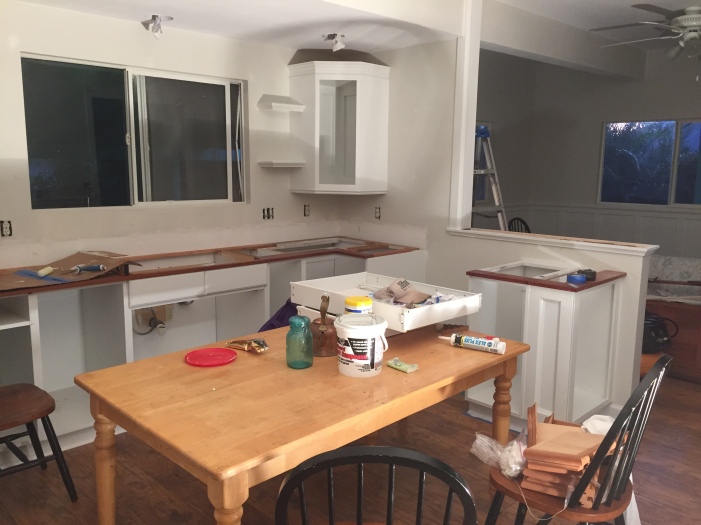
Here are before photos of the kitchen. Neil took these photos the first time he came to see it with the realtor.

kitchen before 1kitchen before 2kitchen before 3


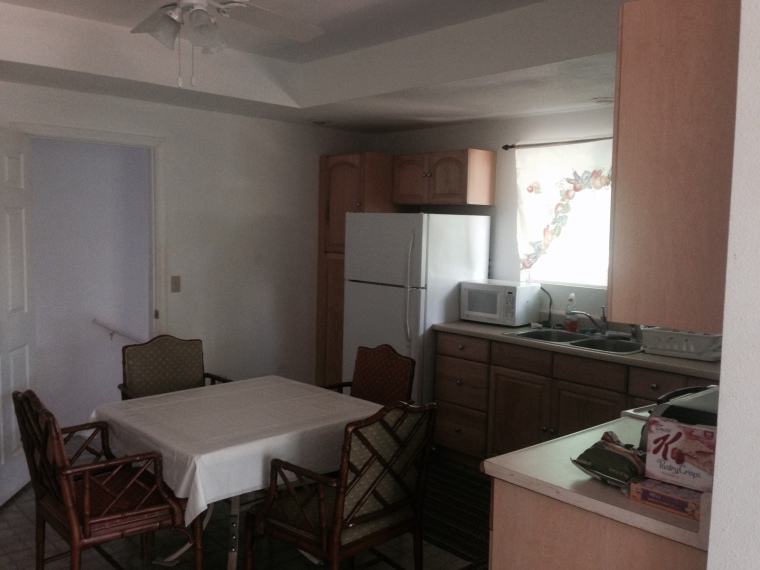
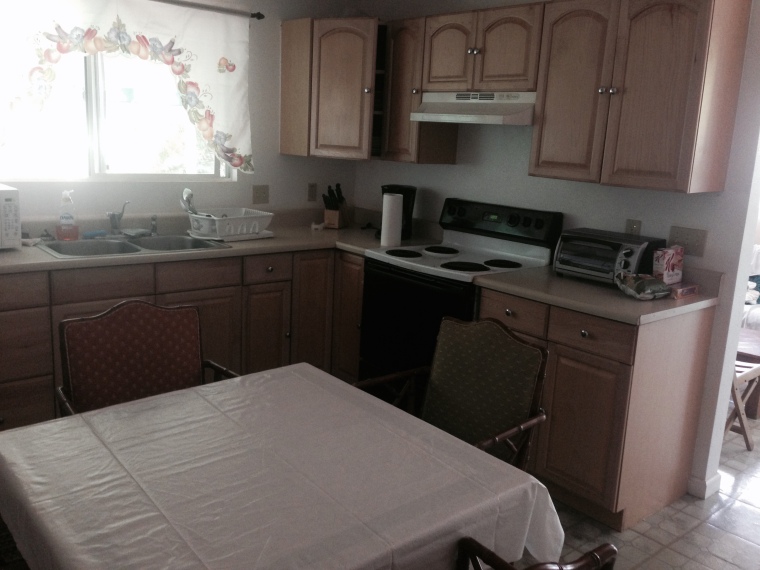
The kitchen is really small and cramped and having a wall between the kitchen and the small living area only exaggerated that. We wanted to take down the entire wall for an open concept kitchen living room area, but couldn’t because of a weight bearing post.  So we took down half of it and removed all the top cabinets. Neil got a paint sprayer and pretty much spray painted every room (minus the bathrooms). It was convenient because we didn’t have any furnitures and we didn’t have to cover the floors because we were covering up the linoleum flooring with laminate floors.

kitchen construction.JPG

Neil really likes Craftsman style so he trimmed all the doors and added board and batten to the kitchen-living area. break down wall

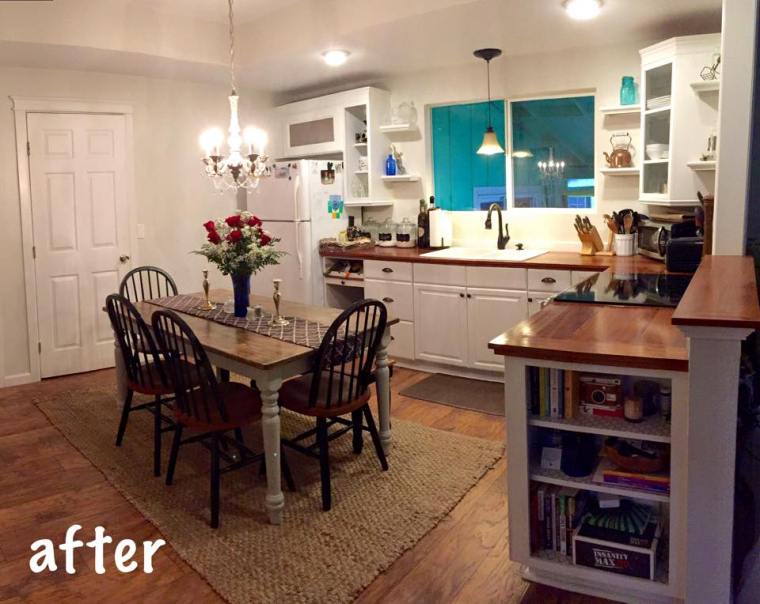
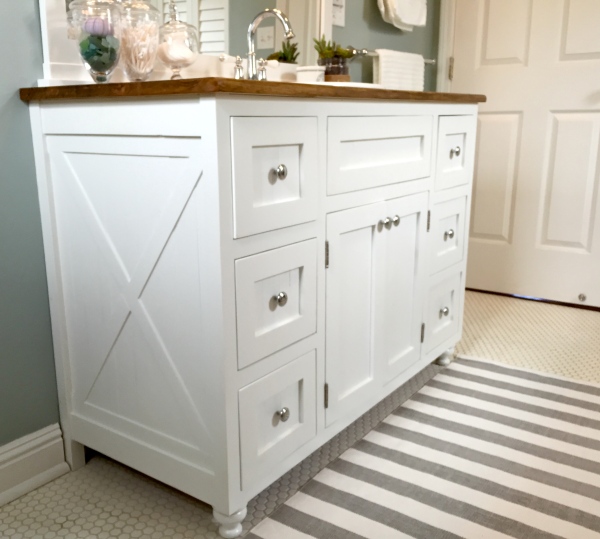
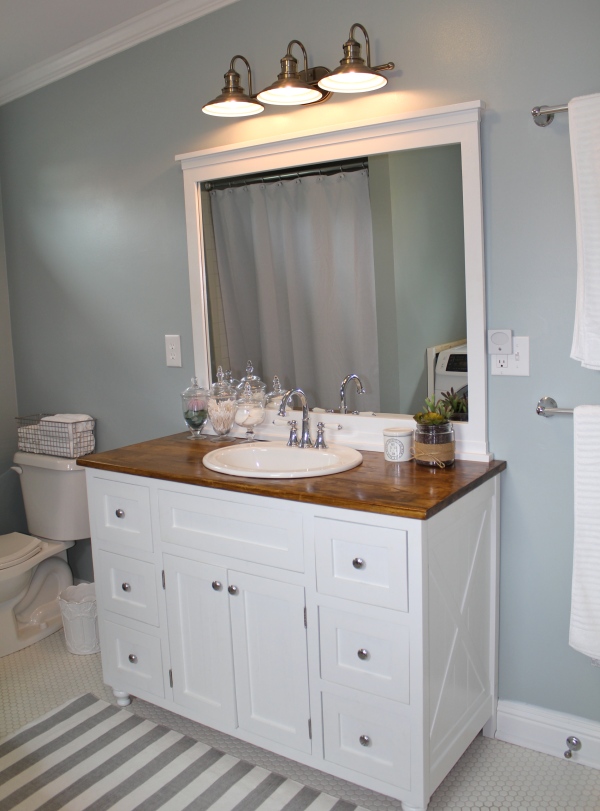
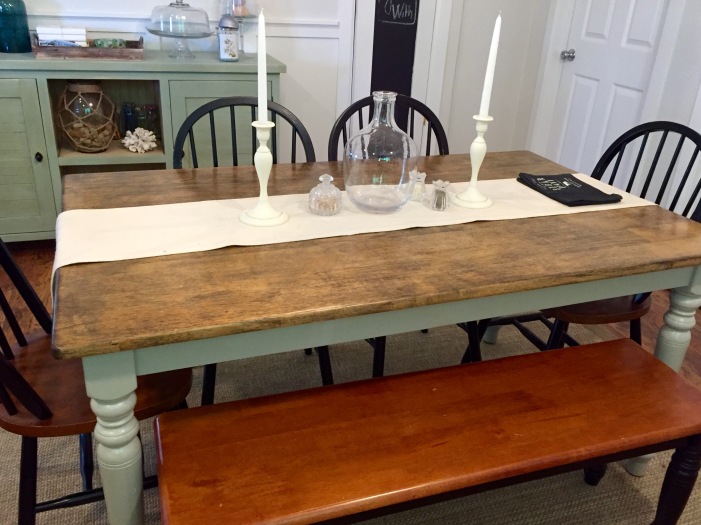
Two months later…we got to this point.  We got rid of the ceiling fan and replaced it with a small chandelier.  We added a pendant light above the sink and added a few LED lights. Got rid of the stainless steal sink and replaced it with a white ceramic double sink and chose an oil rubbed bronze faucet. We reused the bottom drawers and painted them white and added matching oil rubbed bronze cup pulls. I asked for butcher block countertops and Neil told me he was going to make it out of mahogany flooring wood!

kitchen after

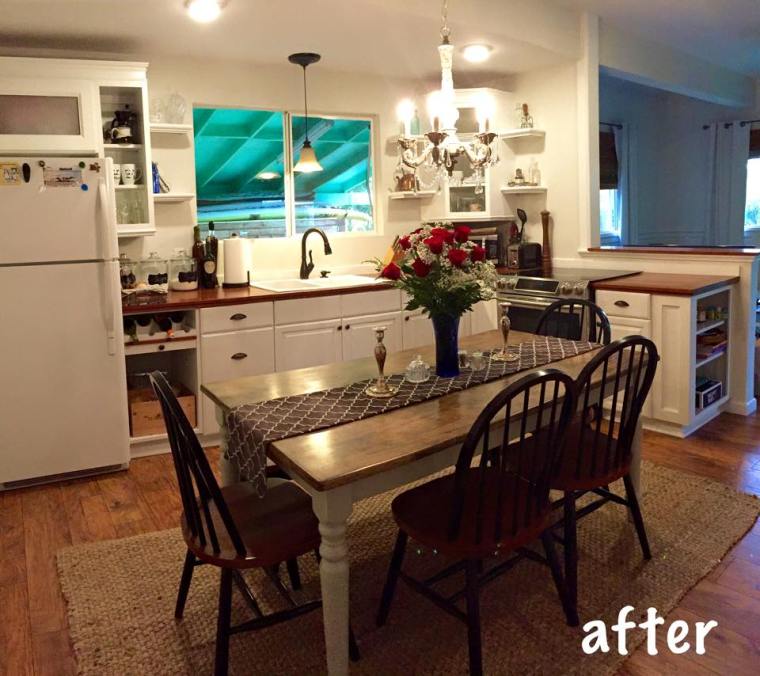
I was skeptical, but it turned out pretty nice. The rich red mahogany wood is a good contrast to all the whiteness in the room. The antique knick-knacks on the floating shelves are from Florida when we visited 2 years ago.

kitchen after2

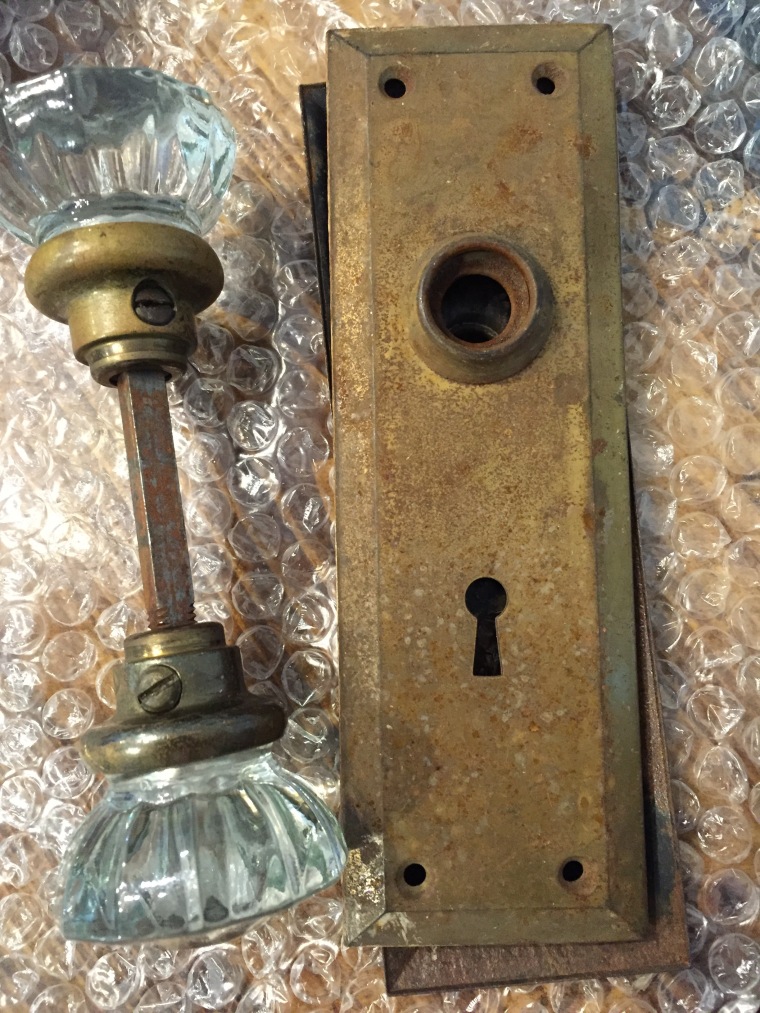
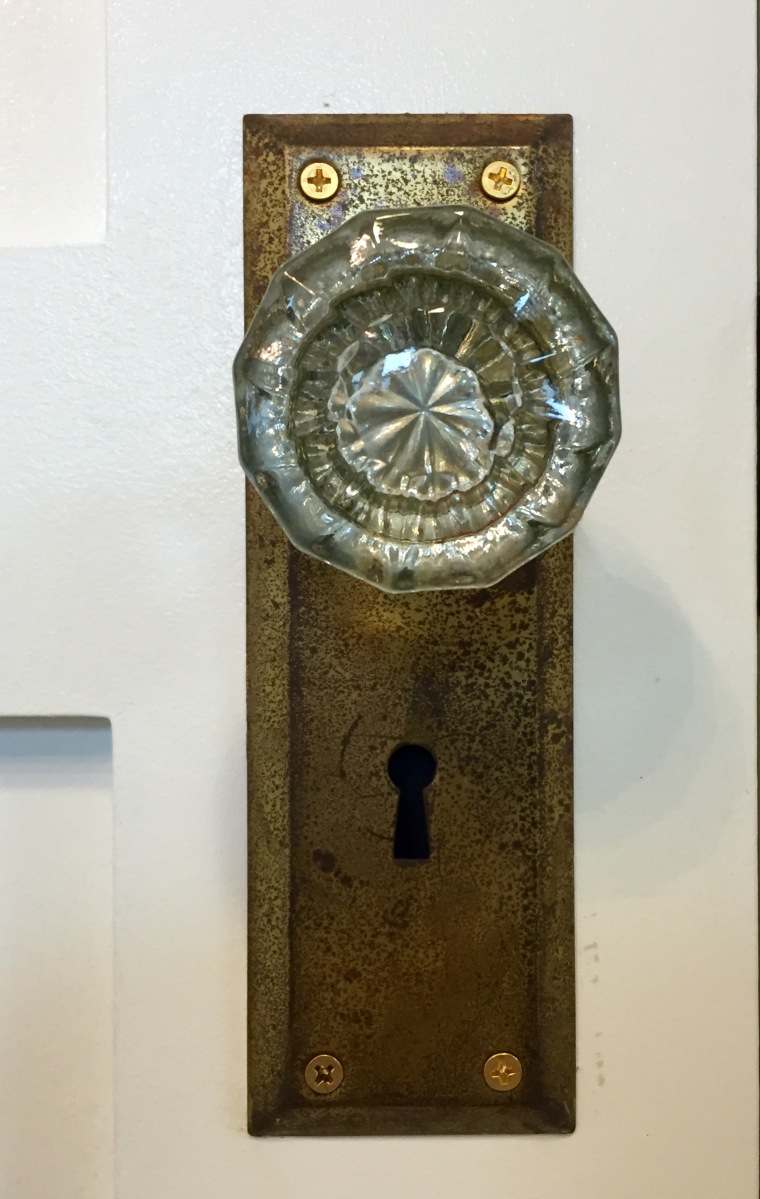
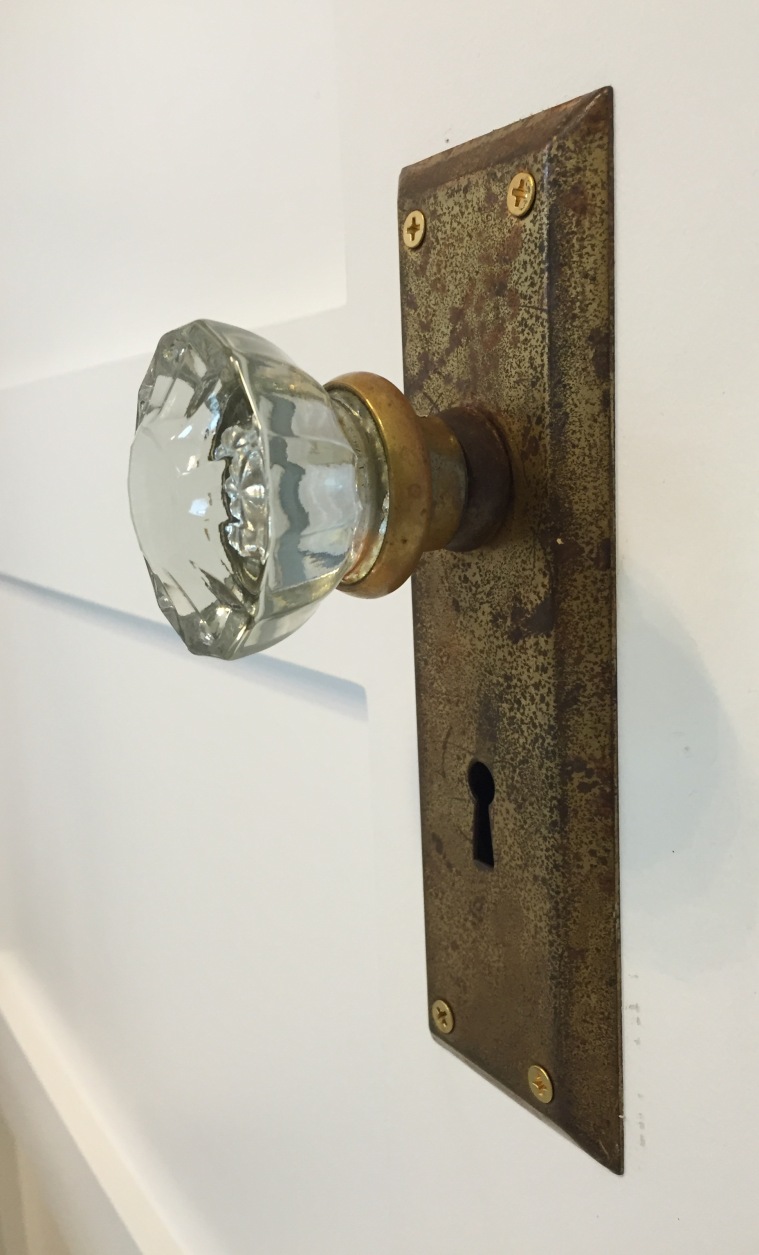
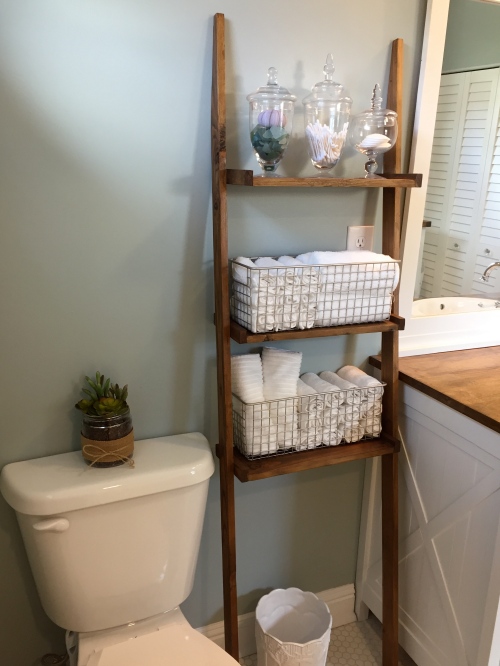
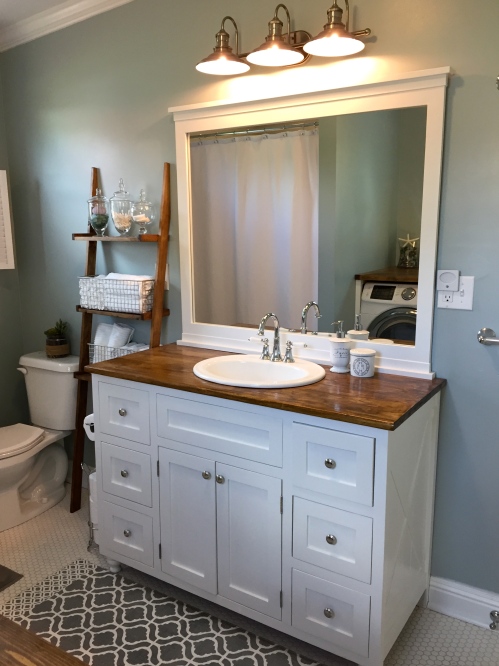
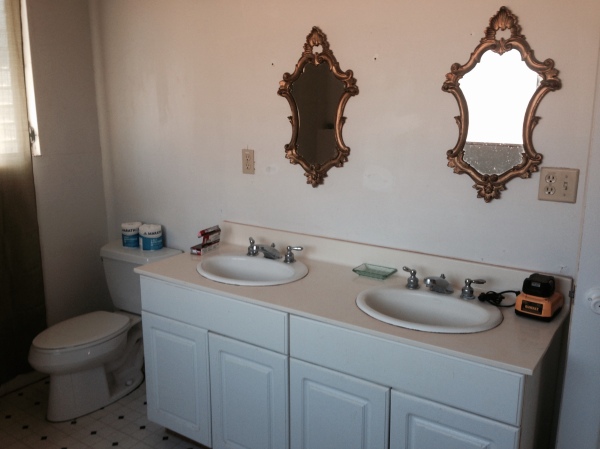
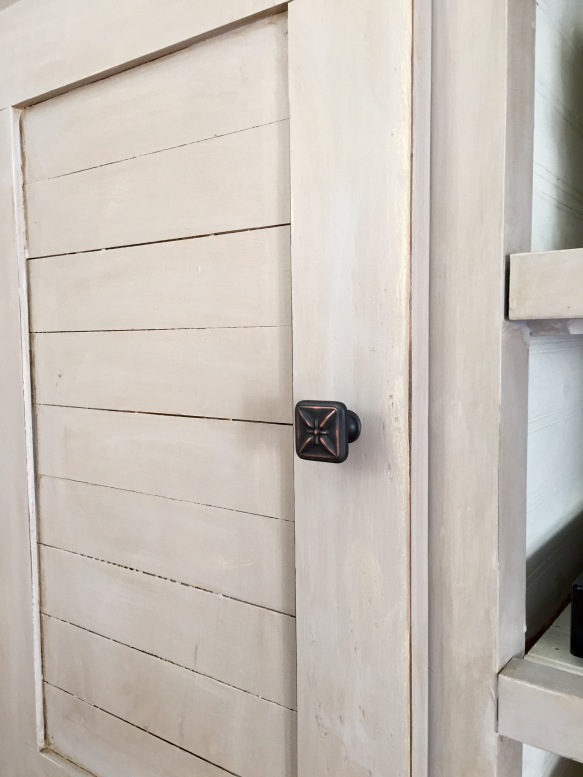
When we were ordering materials to remodel our master bathroom, Neil decided he wanted to replace our 6 paneled doors with 5 paneled doors and upgrade our fridge. Well it took 5 months to get the doors to Hawaii; I’ve almost forgotten about them.  We had planned on using vintage glass knobs and plates that we got in Mt Dora, Florida but we didn’t have the right hardware. So Neil ordered new knobs and got them on. Then he says, “I don’t like it.”

paneled doorglass knob


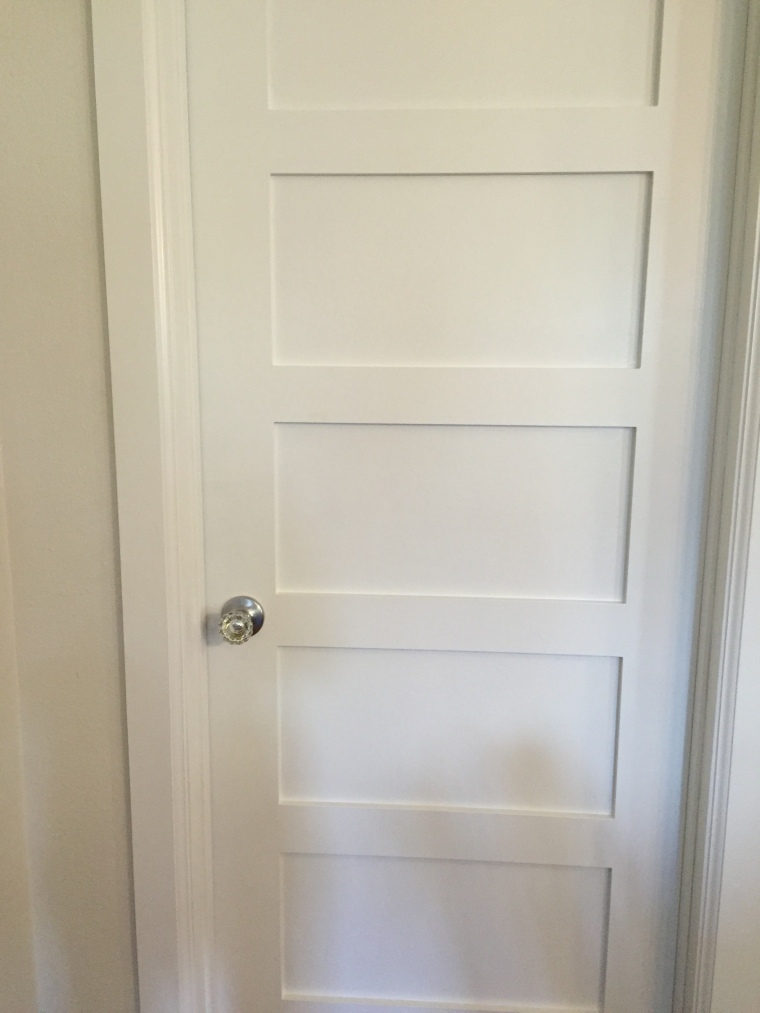
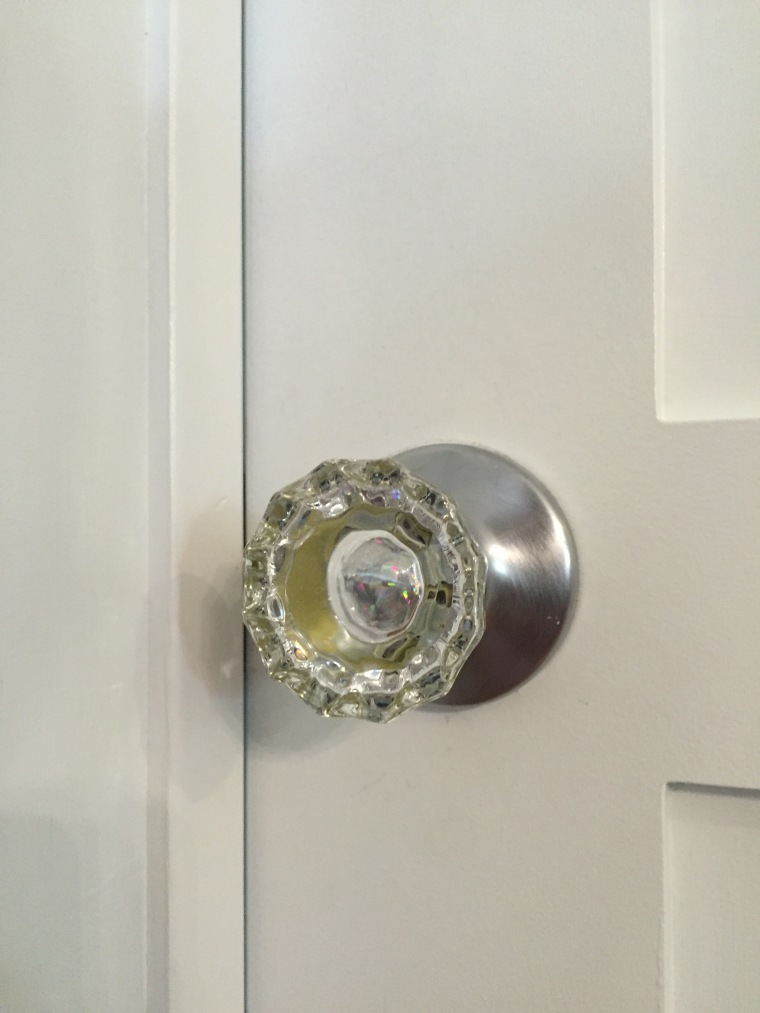
Well, we ended up using the new door knob hardware with the old knob and plates. I’m glad we both like rustic “old shit.” Haha. I think it looks better. All the rust and wear and tear adds character. The only problem is…these door knobs don’t lock!  When it’s just the two of you, there’s no such thing as privacy anyway.

Vintage door knobs platesglass knob1glass knob2


Currently, this is how the kitchen looks.

kitchen now.JPG

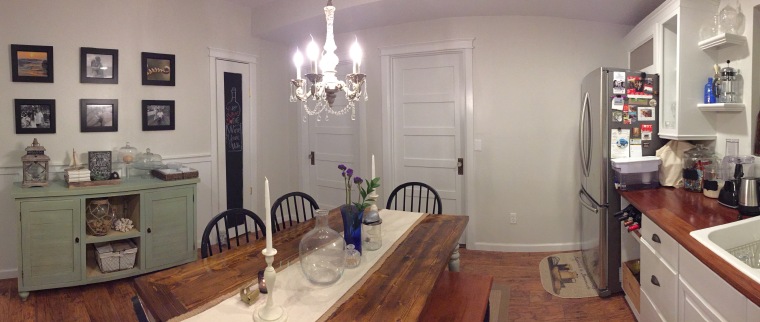
It’s small, but it’s cute, functional and totally me 🙂kitchen now 2.JPG

Modern Farmhouse Bath & Laundry Room Renovation

When you have a small house, you have to find ways to maximize your space.  The last room we renovated was our main bathroom. It’s also our most expensive project to date. We (meaning Neil) pretty much stripped the entire room; from floors to walls and windows. We replaced everything in this room.

This is how our bathroom looked like a year and a half ago. It was really outdated and dingy.
before demoWe started this project back in February and it’s finally coming together.

bathroom panoFor a small plantation house, our bathroom was pretty spacious with a double vanity, closet, jetted tub and a very very tiny corner shower. Neil refused to shower in it and used the guest bathroom for a year.

old bathroom

Neil left the design planning to me of course. I really wanted a modern rustic farmhouse bathroom so I asked for white hexagon tiles, a bigger shower with subway tiles, custom made vanity with large mirror, and a new washer/dryer. Then, I joked I wanted heated floors; and he actually said “sure”!

plumbingIt was a little scary seeing the room totally stripped. We had holes on the floor for a few days while Neil redid the plumbing.  I
think he was in this room and under the house for a good 2 days.

more plumbingNeil literally has blood and sweat invested in this house.

floor heaterI was totally kidding about the heated floors, but apparently Neil also wanted it.  We bought a 20 square foot floor heating system from Amazon (of course) for under $200.

subway tilesMaking memories on the wall…I think Neil hates tiling almost as much as he hates plumbing.  He says he’ll pay someone next time I ask for subway tiles lol. We also added an exhaust fan and light in the shower. Now I can come out of the hot shower and not have a fogged mirror!

showerWe took out the tub and put a washer and dryer instead.  It was (a little) inconvenient going downstairs, outside to do laundry, especially during cold rainy days i.e anything below 65 degrees.  Plus, I rarely ever want to soak in a tub. A washer/dryer was a more practical and functional choice.  Neil built a folding table to match the vanity top.

folding tableNeil always asked what I was going to do with all my sea glass collection.  Well here it is, 3 years worth of beach combing!

seaglassI really would have loved to put the washer and dryer in the closet, but it’s not deep enough. I am proud to say that I painted inside the closet =D

ClosetNeil hates Pinterest because I find endless projects for him to do. Such as this Pottery Barn storage ladder copycat. I wanted it above the toilet, but I wouldn’t have been able to open my window shutters. It turned out better than I expected. Love the apothecary jars and wire baskets; goes well with my rustic farmhouse theme.

ladder storageWe bought a 42 inch mirror from Home Depot and added a wooden frame. It’s actually just sitting on top the vanity, still waiting to be hung.

vanity and ladder storageWe have 6 drawers and under the sink cabinet space. Only 2 drawers belong to Neil (he’s a minimalist). I think with a few more decor pieces, this bathroom will be complete.


DIY Farmhouse Bathroom Vanity

Sometimes, something good comes out of failure.  Such is the case with our bathroom vanity project…

old vanity
This was our old vanity. I’m pretty sure our lovely mirrors were from the hotels.

I like nice stuff. BUT, I also try to get away with having to pay an arm and a leg. It must be the Asian in me.

X mark the spot
More X’s! I wanted a farmhouse style vanity.

I don’t know how long it took to complete this vanity. Mainly because when you live in a third world island called Lanai, things get here just a little slower.

I wanted a white vanity with carrara marble top. I wasn’t quite willing to drop $2500 on just the marble top alone so Neil and I did some research for more affordable options.

We found one blogger who painted a wooden top (it looked real on photos) and another blogger just used contact paper and topped it off with epoxy. Well, we chose the fast, easy route and decided to buy contact paper and epoxy. It was less than $30 for the contact paper and $100 for epoxy.

putting on contact paper
It took some effort and coordination to put on the contact paper. If you’ve read my older blog, the top is the original top from my $30 dining table.
applying epoxy
Neil applied a thick layer of epoxy and let it dried for at least 24 hours.
finished epoxy top
It looked pretty good! We were so ecstatic. BUT then….I started putting stuff on top….AND…they would stick!

I went back and read the blog again and it says to apply polyurethane after the epoxy dries. Neil said NO it’ll turn yellow. Well, I convinced him anyway….

poly fail
DISASTER.

He was not very happy when he saw the polyurethane turn yellow. Ooops.

Well, by the time I got home from work, he’ve already sanded and restained the wood. Amazon emailed us, after waiting almost 2 months, that they couldn’t ship the drawer slides. So, we went on another Home Depot date to Maui…

Left view vanity

I’m glad the faux marble top project didn’t turn out because I actually like the natural stained wood instead. Adds contrast to the white vanity and white every thing else in the room 🙂

Left close up

The bathroom is ALMOST done. Neil just has to build a couple more things.

Right view vanity

This bathroom is also our laundry room. You can see our dryer in the mirror. Neil started making a folding table top. I also want to put a ladder storage above the toilet.

So there you go. An almost disastrous project, turned out to be pretty successful.

“Remember that sometimes not getting what you want is a wonderful stroke of luck.”  ~Dalai Lama

DIY Window Shutters and Muntins

I’m a detail kind of person. And details mean extra cost and/or extra work for my husband. We had very plain windows and as much as I want to replace them, it’s not really in the budget just yet.

Before yard
This was our front porch and our lovely sea foam green exterior paint. Our windows were plain and no window sills.
Before porch
When we bought the house, we had a jungle in our yard. The shrubs and trees were so thick, we couldn’t even see our next door neighbor. We also inherited a bunch of random junk. We’ve slowly cleaned up (WE meaning Neil).

After much convincing, Neil agreed to add window sills and make shutters. He really, really, really didn’t want to, but he couldn’t say NO (lol).

black shutters
Someone gave us a pressure washer. Don’t know if it works, but it sure came in handy. Neil is always innovative and resourceful. I chose Sherwin Williams Caviar black paint for the shutters.

Window sill and shutters

After Neil saw the outcome, he was glad he did it 🙂 BUT it still needed something else… window muntins. I did some research on Pinterest to find ways to create the look for less. Couldn’t find anything that would work for our windows. Neil recommended trying vinyl electrical tape. To which I replied NO! I looked it up and someone already did it! The outcome looked pretty good on photos so I decided to give it a try.

electrical tape
Found these white 3/4 inch electrical tape from Lowe’s. 
muntins
I decided on making 3 x 4 grids. Took a few trials, but after making a template for the vertical and horizontal strip, the process was pretty fast and easy. 
front door
Ta-da! Not too shabby 😀 Not sure how long the electrical tape will stay on. Guess we’ll find out!

I chose Sherwin Williams Halcyon Green for the exterior paint, but it turned out more bluish-grey with very little green. I was disappointed at first, but it grew on me. We chose SW Antique White for the trim and SW Canyon Clay for the skirt. The deck was stained with Olympic Oxford Brown semi-transparent stain.

After front porch
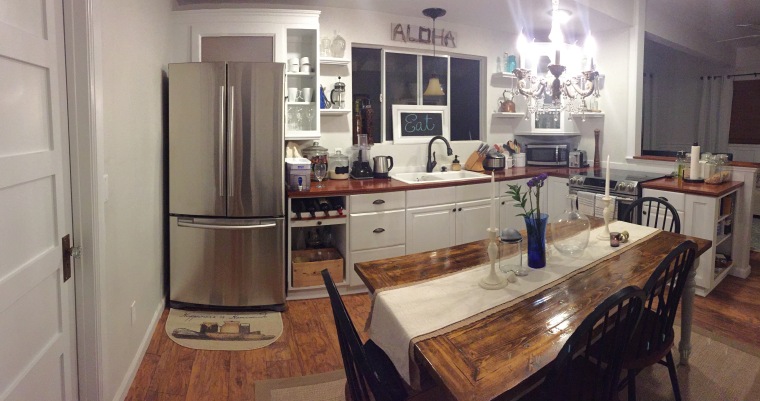
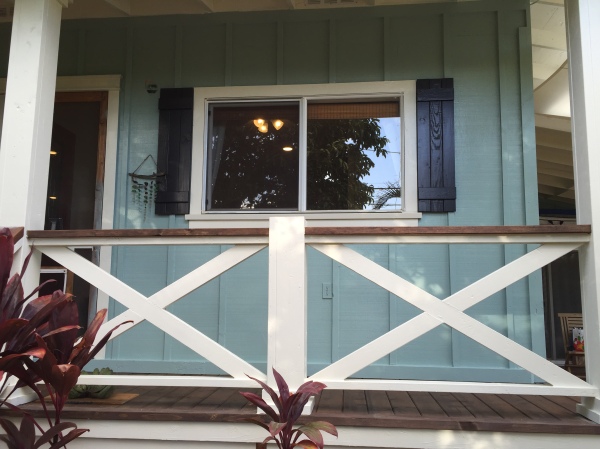
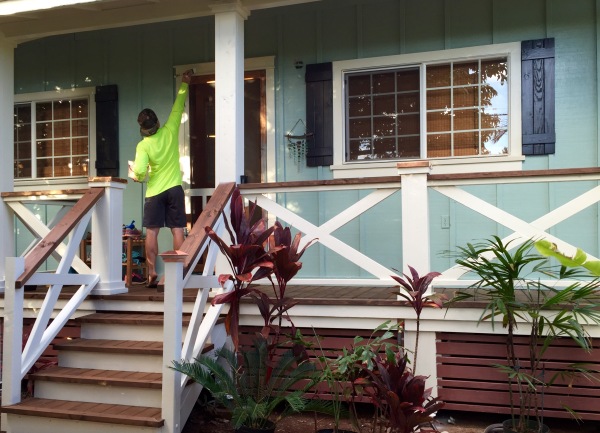
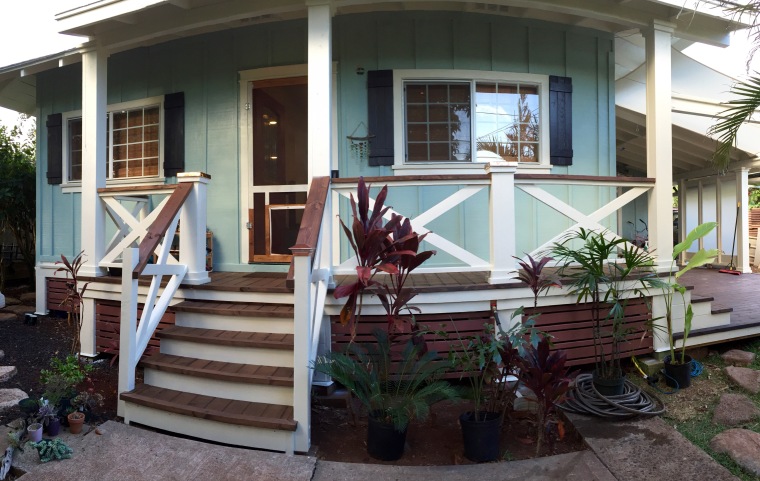
We are 98% done working on the exterior. Oh and we are still waiting on Amazon to send us the other pair of solar post cap and exterior lights (they are really, really slow sending stuff lately!). After that we can do some landscaping, order some outdoor furnitures for the deck, redo the fence and front gate, redo the pathway, maybe a new screen door and doggy door for Pele, and maybe finally build a garden box…house projects never end!

Repurposed Louvered Closet Doors

We have a saying on Lanai. You now the saying, “What happens in Vegas, stays in Vegas”? Well on Lanai, we say “What happens in Lanai, everybody knows.” Which goes to say, privacy is very important when you have your bathroom windows 6 feet away from the street.

before demo

Our house was built in 1931.  It’s been remodeled 2-3 times since, but for some reason, this bathroom is the only room that has jalousies!  It took us a year to finally pull the trigger to remodel the entire room.  When I say “us” it means my husband does all the labor. Occasionally, I’ll hand him a tool as long as he describes how it looks and what color. And of course, I make sure he’s fed and have adequate supplies of candies and iced tea.

jalousie windows
Bye-bye jalousies! As you can see my husband “always” wears personal protective equipment. 
new windows.JPG
Ta-da new windows. 
silver mist
Looks much better with window sill and trim. It took me a while to decide on the paint color, but I decided on Sherwin Williams Silvermist. I love the shades of green/blue/grey. We also replaced our closet door with wider slats louvers. 

I didn’t really wanna use blinds or curtains in my bathroom. Ordering plantation shutters would take months to order and shipped to Lanai. So we repurposed our old louvered closet doors.

old louvered doors

Neil cut about 17 inch of louvered slats and added 1 inch trim bottom and top. Still thinking of other projects to repurpose the rest of the doors for.

shutters
Painted it white. Simple and classic. We bought privacy film to apply on the bottom sash. 
neighbors
That is not my backyard. That’s my neighbor’s front yard. And in between us is a small one-way street. 
privacy film
Now my neighbors and people/cars passing by can’t see me. 
privacy
Now they really can’t see me 🙂

new closet doors

Well this bathroom renovation is almost complete. I’m waiting for my washer/dryer from Lowes. The 6-8 weeks wait is not very fun. We’re also still waiting on Amazon to send us drawer slides for our vanity!  It’s been 4 weeks and they still haven’t shipped. Sigh. I wish I could just walk into a store and go home with what I need. Patience is a virtue…

$30 Flea Market Farm Table Makeover

Ever watch HGTV Flea Market Flip? That show was amazing. How contestants can buy an old outdated furniture for dirt cheap and flip it. Well, that motivated me to find a furniture piece to upgrade. After we bought our house, I went to the flea market with my mom and found a farm table with a $50 sign. I texted a photo to my husband and asked if he could repaint it. He agreed, but told me to haggle for $30. To my surprise, the seller actually gave it to me!

$30 farm table
The table was pretty beat up with children’s pen marks, stains and other wear and tear.
Repainted table
Sanded and restrained the top and painted the legs grey and voila; just like new. I inherited the bench and chairs from my mom.  I’ve been wanting to repaint the chairs for the past year, but haven’t quite decided between antique white or grey. Neil prefers them black the way they are.

Last weekend, we needed to redo the table once again because we had another project in mind for the top.

Sanding
The new top required 9 2x6s. He put it together so fast, I didn’t even get to see the process. Then it was a lot of sanding….
More sanding
Filling the imperfections with wood glue….Then more sanding.
Staining
Next step, apply a coat of wood stain and wait for it to dry before applying polyurethane.
New table top
Definitely looks more rustic. I really wanted to repaint the legs antique white, but hubby says there’s too much white in the room. Now he needs to change the bench seat to match 🙂 And a new pantry door. Never ending projects…

So what did we do with the old table top?

Recycling the farm table
Make a faux marble top for the bathroom vanity!
Vanity sneak peak
Here’s a sneak peak.  We’re still waiting on Amazon to ship us drawer slides, hinges and knobs. Shipping estimate isn’t til May!  We might need another Maui Home Depot trip soon.

More Furniture Distressing and Glazing

There is no such thing as a day off in our house.

My husband made a TV stand a couple of months ago, before he made the buffet table in our dining room. We haven’t really discovered chalk paint and “distressing” and “glazing” furniture yet, so Neil attempted to create a semi-driftwood finished look.

First attempt.JPG

first finished product.JPG
To get this look, he stained it dark brown, then kept layering watered down white paint. He wasn’t quite happy with the outcome, sooooo we refinished it.

We wanted to keep it grey color and chose Sherwin Williams “Essential Grey.” It has a little bit of purple hue (I didn’t take a before photo before he started distressing and glazing it).

calcium carbonate
Mix this with any matte paint to make chalk paint. It’s calcium carbonate…same stuff Tums is made out of. You can buy it on Amazon.
Rustoleum Glaze.JPG
To give your furniture that old look, rub on this decorative glaze , then wipe off excess. You can buy it from Home Depot.

Glazing.jpg

The instructions says to wait 8 hours for the glaze to dry before coating with polyurethane. We only waited 2-3 hours before applying wax.

Distressed.jpg
Neil says “distressing requires special technique”
inside shelves.jpg
We kept the shelves plain antique white, no distressing or glazing.
side view.jpg
I definitely think it looks better than before.


Pele girl.jpg
Pele trying to get my attention because it was time for a treat.

Next project? Repaint the guest bedroom bed frame!

Hand Painted Pineapple

I purchased a world map art online. It looked pretty on photos, but Neil and I were pretty disappointed with the quality. I was going to return it, but Neil decided to paint something over it instead.

Painting over

Since Lanai is known as the “Pineapple Isle,” we decided to paint a pineapple. I  ended up painting on 3 coats of black chalk paint (we’re really into chalk paint these days). Makeup brush

I suck at painting so I left it to Neil to finish the rest. We actually don’t have any fine tip paintbrush so I sacrificed a couple of my makeup brushes!Second coat

Ta-da! Not too bad huh? It’s (temporarily) hanging in the guest bathroom.

Finished product

Valentine’s Day at Lopa Beach

red rose

We haven’t been to the beach since we started our master bathroom renovation 4 weeks ago. I love going to Lopa Beach to beach comb for shells and sea glass.

mud

It’s a 45-60 minute drive from town. It’s unpaved dirt road once you get to the bottom of Keomoku Highway. Most of the time we’ll see deer crossing the road.

trees

This is my favorite area: where the Kiawe trees are overgrown, forming a shaded arch.4wd

Traffic and parking is never a problem on Lanai. And the best part is; 99% of the time, you have the beach all to yourself. fortune


Kanzakura Cherry Blossoms

Kanzakura

One of the many things on my bucket list is to go to Japan during the Spring for the Hanami (cherry blossom viewing).

Luckily, I don’t have to go just yet to see them bloom. I have found 2 trees on Lanai; one on Lanai Avenue and another one on 13th Avenue. I did some research and found out that there are over 60 varieties. This one is called Kanzakura.

Kanzakura (winter cherry) is among the first cherry blossoms to boom.  I have seen them bloom the past 2 years in mid January. In Japan, they are relatively less common and can only be seen in small parks or in private gardens. I don’t know how they got to Lanai, but most likely from Japanese plantation workers back in the Dole Pineapple farming days.

Kanzakura2 A Kanzakura tree has link pink blossoms with 5 petals.

Kanzakura3My husband thinks it’s ridiculous to go to Japan just for the Cherry Blossoms. I guess I would go to experience the food too. Sounds like this would be a fun girls trip…